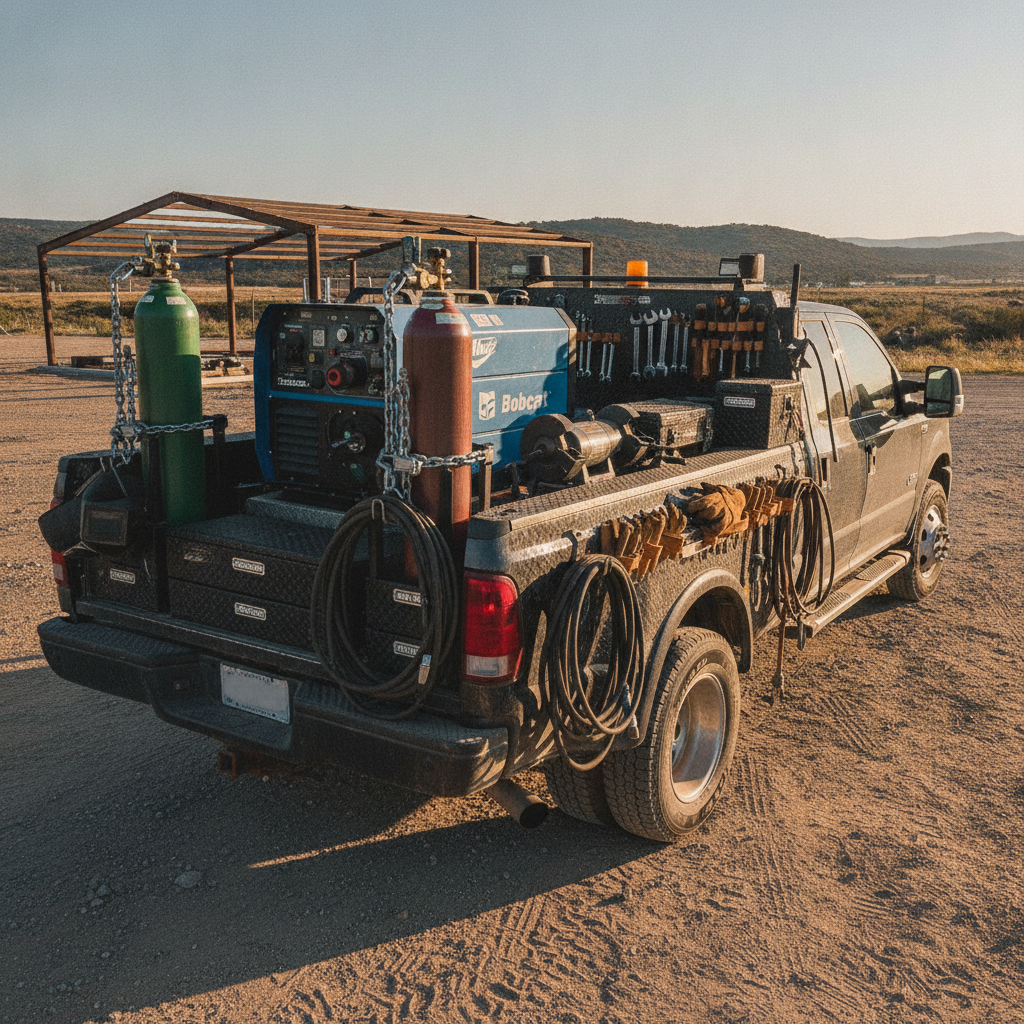
Let me paint you a picture. You show up to a job. The client is watching. You swing open the compartment doors on your rig and spend the next fifteen minutes digging through a pile of wire, consumables, random fittings, and that one stinger you swear you put right there. Your mobile welding truck setup looks like a yard sale survived a tornado. The client starts checking his watch. You start sweating. And every single minute of that circus is coming directly out of your effective hourly rate. We’ve all been there. Some of us are still there. This post is about getting out of there permanently.
Why Your Mobile Welding Truck Setup Is Costing You Real Money
This isn’t theory. It’s arithmetic.
Say you’re billing $95 an hour. If you waste 20 minutes on every job digging around your rig before you strike your first arc, that’s roughly $32 gone before you’ve produced a single bead. Five jobs a week? That’s $160 a week. Over 48 working weeks, you just threw away over $7,500 in unbillable time. All because your truck looks like a junk drawer on wheels.
And that’s just the time you spend hunting for gear. It doesn’t count the time you spend explaining to a client why you’re standing there with your head in a toolbox instead of welding. First impressions matter. A chaotic rig tells a customer one thing: this guy runs a chaotic operation. That costs you repeat business and referrals, which are worth a lot more than $7,500 over a career.
If you’re still figuring out your rates and what your time is actually worth, stop and read this post on pricing for certification services. The math on wasted time applies across the board, not just on cert work.
Mistake #1: No Zones on Your Rig
The biggest mobile welding truck setup mistake I see is treating the truck like one giant storage unit. Everything goes everywhere. You grab what’s closest. You hope for the best.
Your truck needs zones. That’s it. Simple concept, brutal to execute if you’ve been doing it wrong for years. Here’s how to think about it:
The Four-Zone System
Zone 1 — Daily drivers. Everything you touch on every single job goes here. Helmet, gloves, hood, angle grinder, chipping hammer, wire brush. This zone is always accessible, never buried.
Zone 2 — Process-specific gear. Your stingers, your TIG torch, your MIG gun, your leads. Organized by process, coiled properly, not stuffed in like a bowl of spaghetti.
Zone 3 — Consumables. Rods, wire, tips, nozzles, cups, tungstens. Labeled. Dry. Not rattling around loose. A small metal cabinet with labeled drawers will change your life.
Zone 4 — Utility and overflow. Clamps, chains, come-alongs, rigging, safety gear, first aid. Stuff you need occasionally, not every job.
Each zone should have a home that never changes. You should be able to reach in with your eyes half-open at 6 AM and find your hood. If you can’t do that, you don’t have zones. You have chaos with a better story.
Mistake #2: Leads and Cables Living Their Best Unorganized Life
Tangled leads are a productivity killer. Period.
Every minute you spend unraveling a lead is a minute you’re not welding. Leads that are tangled also wear faster at the connections, which means you’re buying leads more often. It’s a lose-lose situation you created by being lazy about how you coil and store them.
Get cable reels or dedicated hooks mounted inside your compartments. Always coil leads the same direction. The over-under coiling method takes about thirty seconds to learn and will make you feel like a different person. Heavy leads like your ground and electrode cable should be stored in a way that lets you pull them out in one motion, not in a way that requires fifteen minutes of untangling before you can do anything else.
Label both ends of every lead. This sounds ridiculous until you’re on a job at dusk trying to figure out which end goes where and you’ve got two identical black cables staring back at you.
If you’re running a multi-process machine in the field — which most of us do now — clean cable management matters even more. Take a look at what I wrote about field-ready multi-process welders for setup considerations that extend to how you organize around them.
Mistake #3: Consumables Without a System
Here’s a common scene. You get to the job. You need 6013s. You have 6013s. Somewhere. Maybe in the compartment on the left. Maybe in that bag on the floor. Maybe in the box under the torch leads. Maybe you used them all last week and forgot to restock.
Consumable chaos is its own special category of misery.
Fix Your Consumable Storage Once and For All
Buy a small metal drawer unit that fits your compartment. Label every drawer. Stick to the labels. Never put 7018s in the 6010 drawer because “I’ll remember.” You won’t. You’re tired.
Keep a running minimum quantity in your head for every consumable you use regularly. When you pull the last of something, you write it down or you add it to your phone. Not when you get home. Right then. Because you will forget.
Keep your stick rods in a proper rod oven or sealed container. Yes, even the LH rods. Especially the LH rods. A bad rod on a structural job because you stored them in a toolbox in a humid climate is not a mistake you want to make twice.
Wire spools should be covered when not in use. Dust and moisture degrade wire faster than you’d think, and bad wire on a field job creates problems that take longer to diagnose than they should. Same goes for TIG filler. Keep it in a tube or a sealed bag, labeled by alloy.
Mistake #4: Gas Cylinder Storage Done Wrong
This one crosses from inefficiency into safety. Unsecured cylinders are a serious hazard. If you’re driving around with a freestanding cylinder rattling around in your truck bed, you need to fix that today. Not this weekend. Today.
Every cylinder gets chained or strapped to the truck. No exceptions. Even the small ones. A 20-pound CO2 cylinder that becomes a projectile in a rear-end collision is a situation nobody survives cleanly.
Beyond safety, your cylinder setup affects how fast you can get to work. Your regulator should be attached and covered, not loose in a box somewhere. Your hoses should be coiled neatly and attached to the cylinder or the machine, not draped across everything else. When you pull up to a job, you should be able to go from truck to arc in under ten minutes if everything is where it belongs.
If you’re running newer battery-assisted hybrid equipment, your gas management situation changes a bit. This post on hybrid battery-powered welders covers some of those setup differences worth knowing about.
Mistake #5: No Pre-Load Checklist
Every pilot runs a pre-flight check before leaving the ground. Surgeons run checklists before cutting. Your rig should be no different.
A pre-load checklist doesn’t make you look weak or disorganized. It makes you look like someone who doesn’t show up to a job missing their ground clamp. Because that happens. It happens to guys who’ve been doing this for twenty years. Fatigue, distraction, rushing between jobs — stuff gets left behind.
Build a Simple Pre-Load Checklist
Your checklist should cover machine, consumables, gas, leads, safety gear, and hand tools. One page, laminated, stuck inside a compartment door. Before you leave for a job, you check it. Takes two minutes. Saves you an emergency run to the supply house mid-job, which costs you at minimum an hour and your client’s confidence.
If you want to think about this in terms of business systems and efficiency, the same thinking that makes a checklist useful in the field applies when you’re building your operation from the ground up. This post on going from garage to shop has some relevant thinking on building repeatable processes early.
Mistake #6: The Machine Itself Is Not Job-Ready
Your machine should be ready to strike an arc when you open the compartment. Not after you fiddle with connections. Not after you figure out why it’s throwing a fault code. Not after you spend ten minutes tracing a bad ground.
After every job, before you load up, you inspect your machine. You check connections. You look for damage to leads, torch, and gun. You make sure everything is set back to neutral or your most common process settings. You don’t leave diagnostics for the next job site.
This matters even more if you’re running equipment that does more than one thing. A multi-process machine that’s been left half-configured from a previous job wastes everyone’s time on the next job. Know your machine well enough to reset it in under a minute.
Speaking of knowing your equipment cold — if you’re ever chasing down weird issues with field equipment, it helps to understand what the machine is actually telling you. Smart monitoring features on newer units can help with that, which is something I covered in this piece on smart arc monitoring for weld technology.
Mistake #7: No Dedicated Spot for Job Documentation
This one is for the guys who are doing any kind of certified or structural work in the field. Your WPS, your traveler, your inspection forms — these should have a specific, dry, accessible home on your truck. Not your back pocket. Not loose in the cab. A clipboard holder, a sealed document sleeve, something intentional.
Showing up without paperwork or showing up with paperwork that got rained on and is now illegible makes you look like a first-day apprentice. It also creates real compliance problems if you’re working on anything that requires documentation.
If you’re moving toward certification work and doing more of this type of field welding, getting organized now will save you serious headaches later. The post on exam readiness mapping for AWS/ASME has good context on the documentation expectations that come with that work.
What a Good Mobile Welding Truck Setup Actually Looks Like
Let me describe a truck that works.
You pull up to the job. You open one compartment and pull out your helmet, your gloves, and your angle grinder without looking. You open another compartment and your leads are coiled neatly on hooks. You pull them out in one motion. Your machine is already connected and set. Your gas cylinder is secure, regulator attached, hose coiled on the cylinder. You walk to the work. You set up your ground. You adjust your settings. You’re welding in under ten minutes.
That’s what a good mobile welding truck setup looks like. Not a showroom. Not a truck that belongs in a magazine. A truck that functions.
The client watching you do all that without drama, without cursing, without a fifteen-minute scavenger hunt, sees a professional. That’s worth more than any discount you could offer on your rate.
Making the Changes Without Rebuilding Everything at Once
You don’t have to gut your rig this weekend to start getting better. Pick the one thing on this list that costs you the most time right now. Fix that. Then fix the next one.
Most of the improvements I’ve described cost very little. A drawer unit for consumables, some cable hooks, a laminated checklist, consistent habits. None of that requires a significant investment. It requires about one Saturday afternoon and a decision to stop doing it the wrong way.
If you’re looking at bigger changes to your operation — new equipment, new niches, building out your service menu — this piece on strategic niches for mobile welders is worth your time. But start with the truck. Everything else runs downstream from being able to show up and work efficiently.
The Bottom Line on Mobile Welding Truck Setup
Your mobile welding truck setup is a direct reflection of how you run your business. A disorganized rig isn’t a personality quirk. It’s a tax you pay on every single job, every single day.
The guys who look like they’ve been doing this forever aren’t just more experienced. They’ve built systems that remove friction from their work. Zones. Labels. Checklists. Proper storage. Consistent habits. That’s the whole secret. There’s nothing fancy about it.
Stop paying the disorganization tax. Get your mobile welding truck setup right and start showing up to jobs ready to work instead of ready to search for your tools. Your rate is too good to be spending it on fifteen minutes of digging through your own truck before every job.
You’ve got the skills. Now build a rig that shows it.